I've been working on a handbag pattern, and of course this has been done. A lot. Next I want to add a large funky flower, and you guessed it, this has been done a lot as well. What's a girl to do? Get inspiration from a vintage piece of jewelry in her jewelry box. :0)
I wear this one often, and it's one of those pieces that gets a bit of attention. Worn with a modern outfit, it adds a bit of vintage fun to my (very small) wardrobe. Since my style was described as sophisticated funky, this fits! The multiple petals with a riot of beads coming out of the center can't be too hard to drum up in fabric, right?
Start by raiding your scrapbook cupboard, your daughter's costume jewelry, and anything with beads you don't want but kept just for an occassion like this. A small pair of wire cutters, some heavier gage wire, wool felt, fabric, needle, thread, fabric glue and safety pins is an approximation of what you'll need for both of these flowers. I also used some acrylic paint and a paintbrush, but that is totally skippable.
Cut a length of about 3" from your wire, and make a "V". Next, make two loops on either side of this to hold the beads. After placing a bead or two, (or charm, or other?) roll the wire down to secure the bead. Make three of these. Join all three down at the base of the "V", and twist a couple times. I leave a little loop at the bottom of the twist for sewing into the flower.
My first flower center!
Now I'm just getting carried away. But if you are going to make several of these, You may as well make them all at once. By the way, when these flowers are done I see multiple uses, pins, headbands... So if that helps you determine how many to make, that's great!
Next, have a break with some hot cocoa and marshmallows.
Cut two pieces of felt, with multiple petals, one smaller and one larger. Yes, I do know that these look like shamrocks. Humor me.
Totally unnessary step, but accent the petals with paint if you wish.
Next, using your needle and heavy thread, knot the end, and starting from the back you will sew your bead center in. Draw the needle from the back, through both layers of felt, and then through the loop in the wire. Basically you are sewing on a button, but instead of a button it's your flower center. As you go, pucker the felt a bit so that it has more dimension.
Making the felt back is easy, just cut a piece of felt, place through the safety pin, and using craft glue, fold the pieces together over the top of pin.
Sew this piece on, looping your thread over the top of the pin, and securing in place.
A funky felt flower pin!!
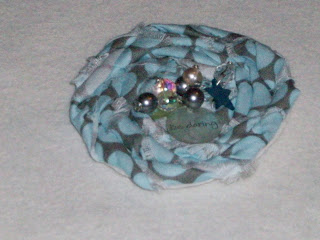
This one is created with a 44" long strip of fabric, 2" wide, with frayed edges. Starting with a 4" circle of felt, glue down the fabric in the center, and start twisting and gluing as you go in a circle. Sew in the center of the flower like you did on the previous one, and glue and sew the back and pin on as well. I need practice with this flower, but for a first it's pretty cute!!
Speaking of, it's hard for me to get much of anything done with this cuteness playing under my table! :0)
Have fun and enjoy the day!!


No comments:
Post a Comment